Sunday, November 22, 2015

INNOVV K1- Motorcycle Specific Recorder

You can have a quick look how Pete from US sharing his experience and installation with the K1, and Click below to see Pete's review about the K1 and how his installation, it is an interesting and very high quality review. 
INNOVV- MotoCam

This is my setup of the Innovv K1 motorcycle dashcam recorder sold by Innovv.com.


I ordered the camera from their website and payed using paypal on a Saturday, and I fully expected it to take a month to arrive like most of the stuff from China, But I received it the following Wednesday, Just 4 days! They ask you to provide your phone number for express delivery, and I'm not sure how it actually helps, but my stuff did arrive very quickly. The package was small and included everything as described.


Videos, 


Friday, November 13, 2015

INNOVV K1-MotoCam

I ordered through the Innovv site on Sunday, and took delivery of the package the following Friday, not bad for posting from Hong Kong.

In the kit you get two water resistant cameras, a water resistant button, gps unit, DVR unit, and a bunch of 3M sticky stuff. Build quality looks to be quite nice.


Installation was pretty easy, I know nothing at all about electronics so I had troubles getting the power sorted out, the instructions say to wire directly to the battery, but that would leave the unit always on. So after a lot of frustration and google, I wired the negative to the battery and the positive to the headlight fuse (I have no idea how or why this works, and I hope i'm not doing any damage to anything by doing this). So unit now powers on and off with the ignition.


Some photos here:


Read more, click below link, https://netrider.net.au/threads/innovv-k1-moto.219945/

Thursday, October 15, 2015

INNOVV K1 Motorcycle camera Installed On 1997 Harley Davidson Road King

1997 Harley Davidson Road King.


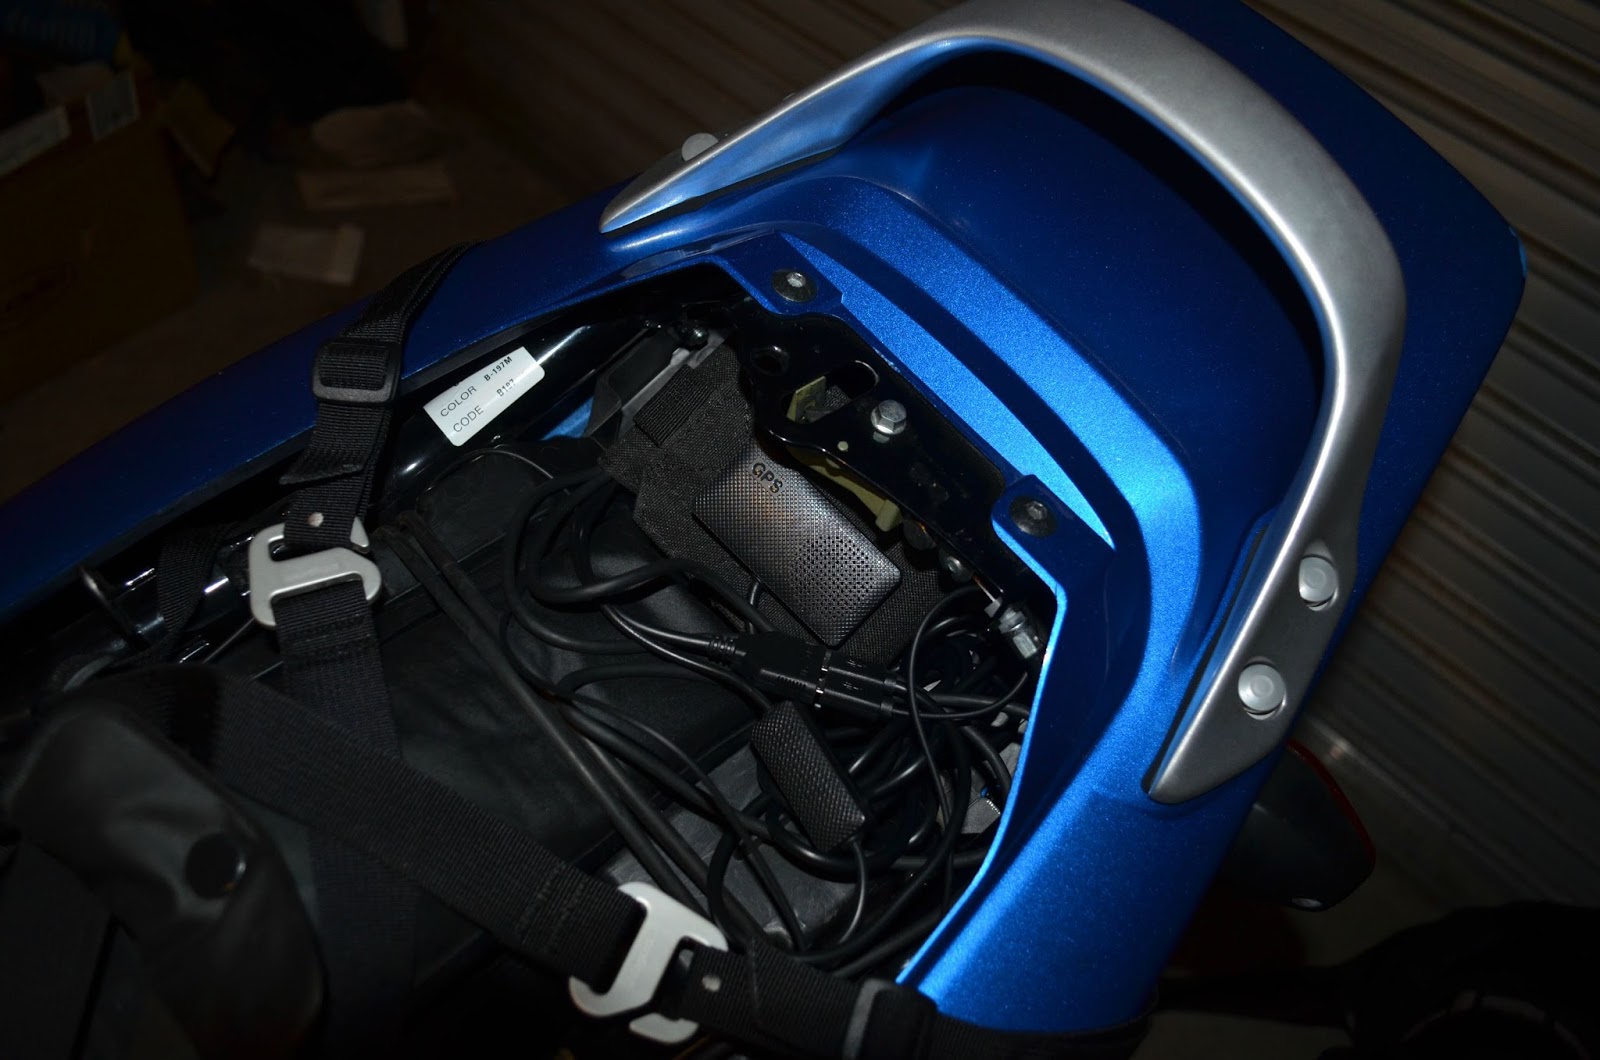
Wiring for the taillight provided me with a keyed power source, fortuitously located right under the seat. There was also a almost-perfectly sized spot for the GPS unit to be sticky-taped in the same area.
Score!


Recording unit mounted very nicely on top of a connection block behind my right side panel. I have to remove the hard bag in order to pull the cover; not a huge pain in the ass but it's not as simple as lifting a seat.


I'm going to pick up a 128g Micro SD card to minimize swapping cards.


Question: Can I adjust video quality to improve recording time?


I absolutely did not want to mount the cameras in a way that detracted from the aesthetics of the bike...more difficult than I thought. There's not a lot of options that give a good view without looking very out of place.

After some trial and error, I bought some corner braces to use as mounts for the cameras, and bent/cut/drilled them to size.

Front camera is attached at my lightbar mounts. I shortened one side of the corner brace and bent the whole thing towards the center of the bike then straight, to clear my turn signal.


The rear camera is attached to a quick release anchor for my top box. The first version used an 'L' bracket but I decided it needed to be closer to the rear of the bike so I bent one side of a corner brace at a right angle.


The taillight is a bit too bright when recording at night, so this may swing the decision to get a smoked lens for it. A few I've seen have opaque sides which would help a lot.

All in all I'm very pleased with the install. The recordings themselves are perfectly adequate for insurance use, but I'm going to use them to record fun rides with friends in addition to/instead of a GoPro or Contour.

I figure with a 128 card I should get a couple hours before I have to worry about recording over footage.


I've been riding it for a week or so now and no one has asked about or even mentioned the cameras.


Saturday, October 3, 2015

Fitting the INNOVV K1 Safety Camera to a solo R1200RT 2012 Model BMW Motorcycle.

Sharing makes riding more fun, thanks Warren from Australia, He shares below, 


After researching the WWW for a suitable safety camera to install on my BMW, the INNOVV K1 weather proof safety camera appeared to best suit my requirements; it has similar characteristics to the Itronics ITB-100HD dash cam that I have had fitted to my motor vehicle since late 2012 and is still functioning very well.
The delivery of the INNOVV K1 from China arrived at my door in less than a week and all communications with Rock at INNOVV has been prompt and positive.

I had seen illustrations of the K1 installed on other BMW’s during my research where the front camera is mounted in front of the oil cooler but this position did not appear very practical to me because it interferes with the flow of air to the oil cooler. This may not be of concern to people who ride in the cooler climates of the northern hemisphere but it becomes very critical where I ride in the land down under of South Australia (the driest State in the driest continent on earth) where we can experience some sustained extremes of temperatures during the summer months.

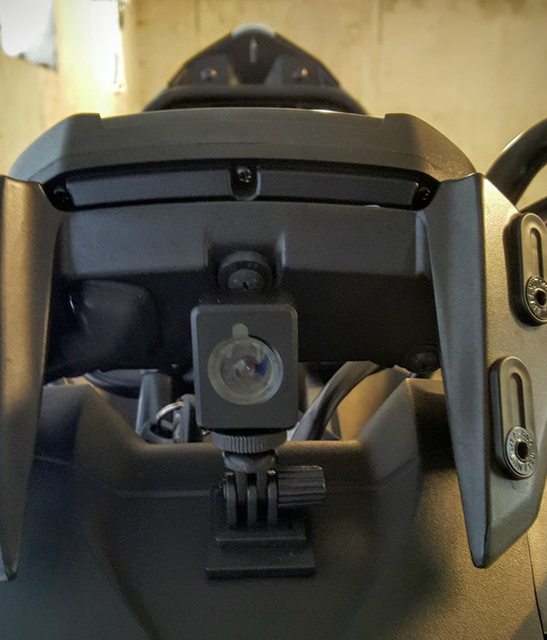
I decided to fit the front camera behind the electric windshield that rises and lower’s at the touch of a button meaning that it needed to be raised sufficiently so that vision would not be obscured when the windshield was in the raised position, but it also provides the camera with some protection from road grime during wet weather.


Front camera on raised bracket, K1 GPS module to the right of camera, remote button on lower left below the left grip

Top view of the front camera and bracket through the windshield

Close view of the front Camera and K1 GPS module.


The rear camera has been fitted to the right side pannier frame which enabled the cable to be fed directly into the area under the rear radio box where the power source is connected.


The recorder has been installed inside the former radio box at the rear of the motorcycle where it is protected from the weather and allows easy access by opening the locked lid of the radio box.
This is a much simpler procedure than installing it under the seat and having to remove the seat each time you want to gain access to the recorder.

The Micro SDXC card is easily removed to download images or the computer can be directly connected with the supplied USB cable


The position of the recorder in the radio box protected from the weather.


Power for the K1 was obtained by connecting to the rear power socket that is supplied from the secondary battery and that I have passed through a waterproof on/off switch that I fitted on the opposite side to the power socket.

The area under the radio box where I connected the power, using the sockets supplied.

The camera on/off switch, with the radio box lid partly open.
The labels are not visible when the lid is closed

View of Switch, rear camera and bracket


The problems encountered during installation

Fitting the cameras
The first problem I had was finding a supplier that had ¼ inch UNC bolts to secure the cameras. When I finally found them the shortest that I could obtain were ½ inch long, which were too long to tighten the cameras to the brackets even with the stainless steel spring washers that I was using. I got them to fit by grinding then down to the necessary size. I can understand brackets not being supplied because of the variety of methods and locations that customers will use to fit their cameras, but I think it would be a good idea of one bolt of the correct thread was supplied with each camera.
With the camera housing being aluminium and the bolts that I used being high tensile steel I coated the threads with some Duralac before tightening them. This is an anti corrosive joining compound which inhibits electrolytic corrosion between dissimilar metals. There are probably different brands available.

Channelling the cables
Channelling the cables from the front to the rear of the BMW so that they were out of harm’s way required the lowering of the left crash bar, the removal of the seat, the left side panels, and the left flashing turn indicator with fairing panel; by following the procedures contained in the Riders Manual.
This facilitated the channelling of the cables from the front camera and K1 GPS module down through the top of the fairing behind the windshield, and then together with the cable from the remote button (all taped together at 10cm intervals) under the fuel tank and clear of the motor, along the left side frame to the rear. The 2 metre length of cabling from the camera and the GPS module was just sufficient to meet up with where I wanted to mount the recorder in the rear radio box.

Power supply
My BMW is fitted with a secondary battery which feeds directly to the rear power socket, independent of the CANbus electrical system, and was used for supplying power to radios. Unlike the standard connection where the power to this power socket is active when the ignition is turned on and becomes inactive two minutes after the ignition is switched off, which would have made it ideal to source the power for the K1, the power to my power socket is constantly active.

I intended to get around this by connecting to this power source and passing it through a 12V Relay which would be activated by power from the tail light that becomes active as soon as the ignition is turned on and inactive when the ignition is switch off.  Simple as it sounds and would work in the majority of cases, it did not work on the BMW.

I started fault finding using my multimeter and found that I was getting 12V from the power socket but less than 3V from the connection to the tail light, which was insufficient power to trigger the 12V Relay.
Nothing wrong with the connections I had made, the problem was caused by a BMW method of providing both the tail light and stop light by way of a single filament globe, where only a low voltage power is provided to power the tail light and then that power is boosted to the same filament when the brake is applied to brighten the globe.

The solution was to discard the Relay and to pass the power from the power socket through an on/off switch, because as a novice I was not prepared to tap into the CANbus system to find another ignition source and risk causing costly damage to the electrical system as has happened to some people.

I have read about another customer using the PDM60 (Power Distribution Module that can accommodate up to six additional components) to avoid this danger but I could not justify the additional cost to power just one addition component.

Some things to be aware of.
When configuring your settings on the K1 recorder, be aware that in addition to setting your local time you must also set the GPS Time Zone for your area. This is most important if you have your GPS connected to your recorder. If you fail to set the GPS Time Zone, as I did, you will find that most of your video files will be filed out of order. The reason for this is that until your GPS makes contact with the satellites your recorder will record the time as per your local time settings, but when the GPS has made contact with the satellites the recorder will record times as per the Time Zone that it set.

By way of example, Australian Central standard time zone is +9½ hours and the default time zone in the recorder is + 4 hours.  So the time stamp on the video files recorded after the GPS kicked-in was 5½ earlier than the actual time that I was riding.

One shortfall that I have noticed with the K1 Recorder is that Time Zones can only be adjusted to the nearest hour. Because of this, Time Zones that are at 30 minutes intervals like mine will always have their time stamp showing incorrect times of 30 minutes. I think that this is something that needs to be attended to when the software is updated. It is a feature that is available on all of my Garmin devices and should not be difficult to correct.

Tuesday, September 22, 2015

Let's play INNOVV K1 1080p Dual lens motorcycle recording system

Sharing makes riding more fun.

Thank you for sharing, Nothing more than that to be good support for us and riders. 

We would like to create an environment that not only has fun with the product, the installation, people also have enjoyment with the riding, and sharing!! We have connection and taking with every customer, encourage them to share the fun with the K1. 

The more fun we shared, even more fun we created,
Sharing makes riding more fun,
Have fun and enjoy!


Thursday, September 17, 2015

Dashcam Review: Innovv K1 2-channel Motorcycle DVR

Apologies in advance for the long post, but thought I’d share my experience with installing my new dashcam on my NCX - something I wanted to do for some time, but have been putting of until now.

As a commuter who uses his NCX every day around London, I’ve always wanted to install a dashcam on my bike for the extra insurance against those sleepy/angry/doing makeup/on the phone cagers we deal with on the daily peak hour commute. Having had two SMIDSYs in the past, I figured it’s probably a matter of when, not if, the next one will be, so best have that little extra insurance, just in case.

I know there are hundreds of different options out there, but for me, the solution had to be:
  • Permanent and wired in - Plugging it in and changing batteries and switching it on and off every time I ride will get tiring.
  • Discrete  - Needed to be tucked away and just “work”. I knew this meant more work installing it, but nothing screams “rob me” than a shiny GoPro flimsily clamped onto the handlebars.
  • Not too expensive -  Enough to pay for decent quality, but not so much that it’s obvious the profit’s spent on sponsoring extreme sports and filming bikini clad girls on exotic beaches.
  • Front and back - The more coverage the better.
  • Dashcam features - Functions specific to dashcam recorders, like auto on/off, motion detection, SD card cycling, etc.
Click below to learn more details and the discussions. 


Tuesday, September 1, 2015

Friday, July 24, 2015

Innovv C3 hits CityBike on issue of Aug, 2015

Innovv C3

http://citybike.com/index-2.html

Words: Max Klein
Photos: Surj Gish


Bay Area traffic is horrible. With all the texting, selfies, spilled coffee, and “Lanesharing?
NOT ON MY WATCH” idiocy that takes place, I wanted a reliable “evidence collection” camera for my commute rides. I have a handful of “action cameras” that would capture the carnage and prove my light was green, but I have to remember to charge them, bring them with me, and worry about battery life / memory card capacity every ride time I ride, otherwise the whole thing is pointless.
Oh, and I have to remember to hit the record button.

I wanted to ride without having to worry about charging batteries and changing memory cards. I wanted to turn the key on and go, as if I didn’t have to record my every move, just in case.

The Innovv C3 hits on all cylinders. The system consists of a bullet lens that plugs into a separate camera box (or DVR, if you prefer) via an HDMI cable. As with other cameras, there are multiple mounting options, ranging from helmet to handlebars. A simple switch on the side allowsyou to choose between single recording, continuous recording, or flashlight. No, “flashlight” is not some new ultra-HD compression tech! it’s just a single LED flashlight.

On the DVR, there are three buttons that allow you to change recording modes, start and stop recording, and turn the unit off. Also on the DVR is a multi-color LED that indicates what mode the C3 is in!red for 1080p / 30fps, green for 720p / 60fps, orange for 3 megapixel photos. All files are
recorded onto a microSD card, which you must supply.

Innovv sent us two lenses, one with a 90-degree field of view and another with wider 120-degree coverage. Standard kits (the ones you guys are gonna go buy after
reading this) include one or the other. Also in the box are data cables, power converters
and cables (for hardwiring, like my setup), and various mounting options for the lens, including helmet and tripod screw mounts!which are very versatile for permanent mounting.

The two recording methods are pretty much what they sound like. The single recording mode will fill the card up once and stop, while the continuous recording mode will “loop,” overwriting the earliest
files when the card runs out of space. Hello dashcam.

Both lenses are waterproof!perfect for optional external mic, but it plugs into the same port that I needed for power.

Speaking of plugging things in!the camera must have a lens attached to connect to a computer and adjust settings such as file size. That’s a significant problem if you want to permanently mouth the whole shebang, which was my plan. Fortunately, I had two lenses, and only mounted one.

Video capture has been completely reliable. I start the bike, the C3 starts recording. I end up with a folder full of smallish video files, which sounds like a mess, but actually turns out to be ok. Looking for specific footage? Easy, just look for the time stamps around the time your footage would have been captured. No more scrolling through a giant video file to find three seconds of footage.

Customer support is available through email, and while there is sometimes a little lost in translation, they’re responsive and I was able to get all of my questions answered.

Although it has some connectivity limitations, these shortcomings are easy to overlook, and the C3’s excellent video quality, two-piece form factor and hardwire capability make it a perfect commuter cam. I’ll be adding one to all of my bikes.
Learn more about Innovv’s cameras, and get your own C3, at innovv.com.

Tuesday, June 30, 2015

INNOVV 2CH Full HD Motorycle Recording System

Hi Innovv, 

I have been in the market for a good dual camera set up for my bike after an accident tore my bike apart and I was unable to find the guy who did it after he ran. The snake lenses are a stroke of genius and exactly what I'm looking for, however, I was hoping to find a dual set up to cover both front and back. 

I was wondering if there were any plans to add a dual lens camera to the line up. You offer a product that is exactly what bikers are looking for, no useless frills like a screen I'll never use. Just 2 waterproof lens I can mount where I need, and a camera I can mount under the seat which provides all the security, safety from impact, and water protection we need. The only thing more I could ask for is a dual lens hub to stream line a dual set up like I am planning. Truth be told, I will probably buy 2 singles if there is no plan to create a dual lens set up and just replace the hub if an upgrade is ever made.

I appreciate any incite with your future plans for this product. 

Thank You, 
Chad Carrone


We received many messages asked for dual motorcycle recording system, and now we are working on this new development and would like to discuss with inmates about features and specifications. 

The new development has a recording unit with a 2.7" screen for easy setting, live recording review, and two wired lenses, a wired recording control button, GPS is an optional. 

The first question is what is the length of front lens, and what length is the rear lens?
The C3 lens cable is 1.5m.

One Inmate told me front is 1.5m, and real is 0.5m, he has Ninja 650.


Two lens has cube shape solid aluminum case, the size is width x depth x high= 29mm x 37mm x 29mm. It would be similar as the below photos. 
There are 3 x 1/4" screw holes on top, left, right side, That design is for "L" shape basket mounting.


More information and discussion can find from below link, 

Friday, June 5, 2015

That could've went very VERY wrong


This is the video shared by motorcycle rider who has Innovv C3 on his bike for a while and almost caught an accident. 


That time I almost got killed by a [Vulva]... but dat reflex tho!

This idiot actually drove past the lane and into the dirt shoulder.


Friday, May 22, 2015

Innovv C3 motorcycle "dash"cam installed on the R1200GS / 2011

"Just install, wire the power in, set to Loop and forget it until you need the footage." (Voz comment)

Set-up using a old radio-front box under the (GSA) seat of the R1200GS / 2011 to suit the Innovv C3 recording-unit.

Installed a 12 to 5 volt (USB) converter under the tool box area and is connected from the switch power (fusebox) to the recording-unit, so it starts recording when the power is on.

The cam itself is behind the windscreen to give it a bit more protection against rain and dust.
I do get some reflection from the bike-screen but that doesn't bother me for the way I use the cam :-)